CADENAS PARTsolutions Support
Quick Links:
Universal Viewer
3D Viewer Plug-In for Chrome
3D PDF Support
CATIA Macro Support
SW Macro Support
PART2CAD Support
Help FAQ
General Support
When Using the Embedded Part Configurator
We provide web configurators for many of our customers to embed directly into their website. These configurators allow users to configure a part or assembly, preview an interactive 3D image of it and then download it as a CAD native or neutral format file.
PARTsolutions supports these browsers:
- Google Chrome
- Mozilla Firefox
- Microsoft Edge
- Microsoft Internet Explorer
Embedded Part Configurator CAD Format Support
PARTsolutions can deliver over 100files formats. Many of our customers license these formats, making it possible for users to download a CAD file in over 100 native formats and versions from the product configurator. The majority of CAD file options will provide a zip file containing the native CAD file. Two programs, CATIA and SolidWorks, are also supported by macro files that can be downloaded; see help below to learn how to open these files.
PARTsolutions Enterprise Users
Enter the Main CADENAS Support Site
As an active user of PARTsolutions, you can use our support page to keep you productive and up-to-date.
Download Updates and More
Here, you can download important parts of your 3D catalog Management System:
- Updates to CAD interfaces, for new CAD versions
- Updates to PARTsolutions enterprise
- Updates to PDM interfaces
- Updates to Supplier catalogs
Get Notified When Catalogs Change
Designers can participate in our active catalog notification program. Sign up to get automatic email when the catalogs of your choice have been updated. You decide when to download any updated catalog and load into PARTsolutions in just a few clicks.
Download Tools for Integrators
Here you will find direct access to PARTsolutions API documents and source code for customers and partners who maintain their own interfaces to PARTsolutions.
Download Tools for Integrators
Here you will find direct access to PARTsolutions API documents and source code for customers and partners who maintain their own interfaces to PARTsolutions.
UNIVERSAL VIEWER
PARTsolutions provides an interactive 3D view of your selected or configured part via a universal WebGL interface. This interface requires no special installation or permissions and is compatible with virtually all modern web browsers.

CHROME 3D VIEWER
3D Viewer Support For Chrome
The CADENAS PARTsolutions viewer works in Chrome via a universal WebGL interface. This interface requires no special installation or permissions and is compatible with virtually all modern web browsers.

3D PDF Viewer Help
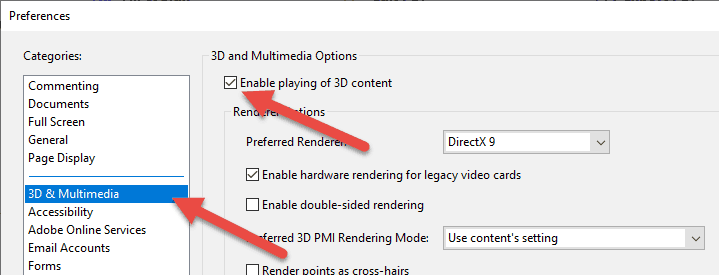
It is possible that some users may have difficulty viewing 3D content within the PDF Datasheet. If you are experiencing an issue with the 3D content of a PDF Datasheet we recommend using Adobe Reader to open the file, rather than the built-in PDF reader of some browsers. You may also need to enable 3D content within your Adobe Reader settings:
- In Adobe Reader go to Edit à Preferences
- Select 3D & Multimedia from the Categories field
- Make sure “Enable playing of 3D content” box is checked
Acrobat version:
PARTsolutions recommends using Adobe Acrobat Reader DC for best results.
CATIA MACRO
PARTsolutions files for CATIA V5 will be delivered in an archived folder (.zip extension) as CATIA Macro files (.CATscript extension). In order to utilize these files, please do the following:
CATIA V5 Toolbar:
- Use WinZip (or equivalent program) to extract the files contained in the .zip archive.
- Start the Macro Dialog from the CATIA V5 Menu (Tools à MacroàMacros), or simply press Alt + F8 to open the macro menu.
- Locate .CATscript file by selecting Macro Libraries…
- Find an existing library:
- Select Add existing library…
- Choose the directory location and select OK.
- Select Run Macro.
- Enter the destination directory where the part will be stored.
Overview
Step 1: Unzip Folder to extract files contained in the .zip archive use WinZip or an equivalent program.
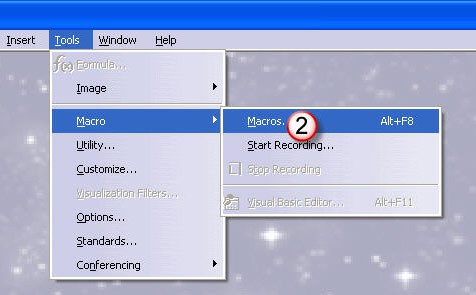
Use the CATIA V5 Menu toolbar: Tools à MacroàMacros. This process can also be done by pressing Alt+F8.
Step 2: Open Macro Dialog
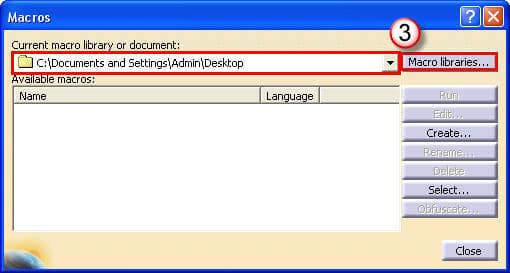
Step 3: Add Existing Library
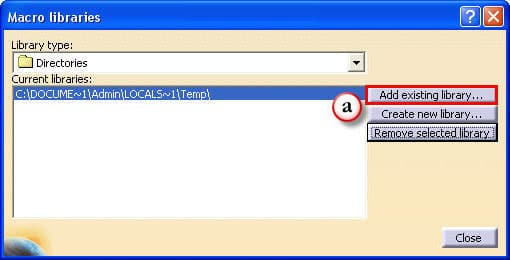
To find the .CATscript file location select “Add exisiting library…”.
Step 4: Search for Directory
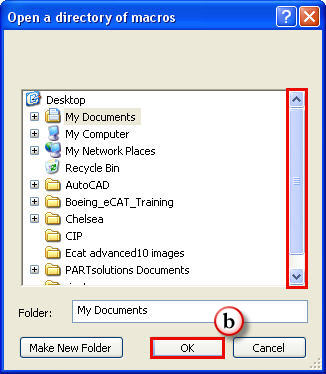
Use the scroll bar to find and select file location and then press “OK” to continue.
Step 5: Run Macro
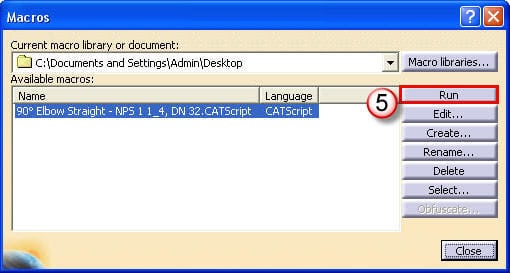
Select .CATscript file and then “Run” to continue.
Step 6: Directory Path
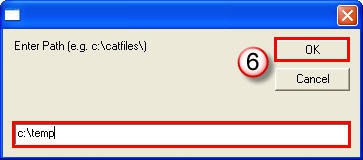
Enter the destination directory where the part will be stored then press “OK” to continue.
Congratulations!
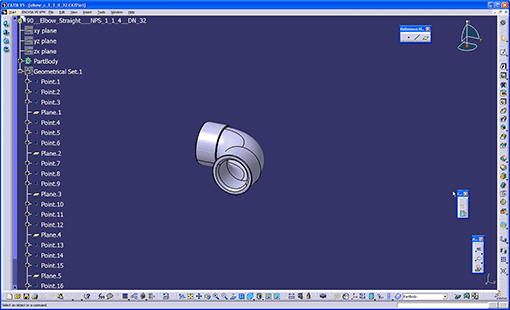
The CATIA Macro file process is now complete.
SOLIDWORKS MACRO
PARTsolutions files for SolidWorks will be delivered in an archived folder (.zip extension) as SolidWorks Visual Basic files (.swb extension). In order to utilize these files, please use one of the following methods:
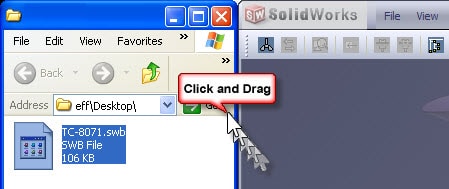
Drag and Drop:
- Use WinZip (or equivalent program) to extract the files contained in the .zip archive.
- Drag and drop the macro file (.swb extension) into an open instance of SolidWorks. NOTE: Don’t drag & drop the macro into an open part/assembly file.
- When prompted, select the directory location for the part(s) / assembly to be saved.
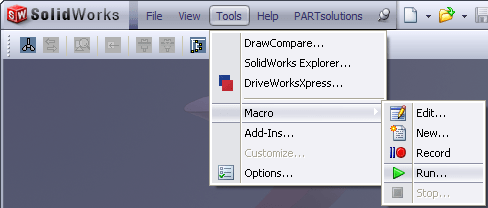
SolidWorks Tools Menu:
Step 1: Unzip Folder
- Use WinZip (or equivalent program) to extract the files contained in the .zip archive.
- From the SolidWorks toolbar select: Tools Macro Run.
- Locate the macro file (.swb extension) and select it.
- When prompted, select the directory location for the part(s) / assembly to be saved.
The SolidWorks Macro file process is now complete.
PART2CAD
PARTsolutions now offers the ability to insert a model directly from your browser into your running CAD program, via the PART2CAD Direct Insert interface. When choosing PART. If you have selected the PART2CAD option for your models, you will first need to download the PART2CADstarter application in order to connect the PARTsolutions configurator to your CAD program.
- Download the PART2CAD interface application
- Run the part2cadstarter.exe program in order to install the application

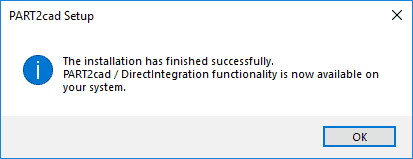
- Launch the setup program

- Let the installation run to completion then select OK
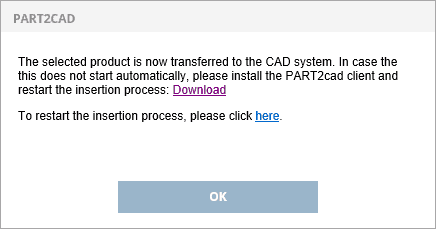
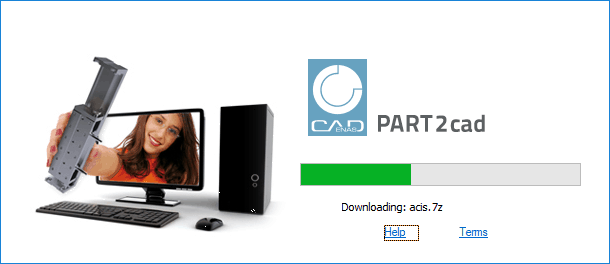
- On the PART2CAD dialog click "here" to restart the insertion process (first time only)

- The necessary components will download via the PART2CAD Interface
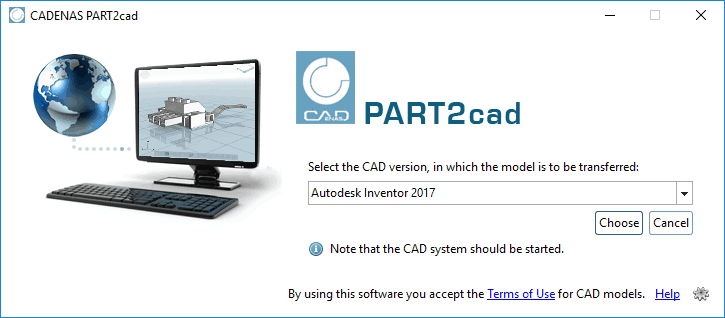
- Select your CAD version (CAD program must be open on your PC)
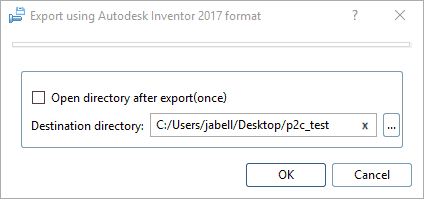
- Select your destination directory
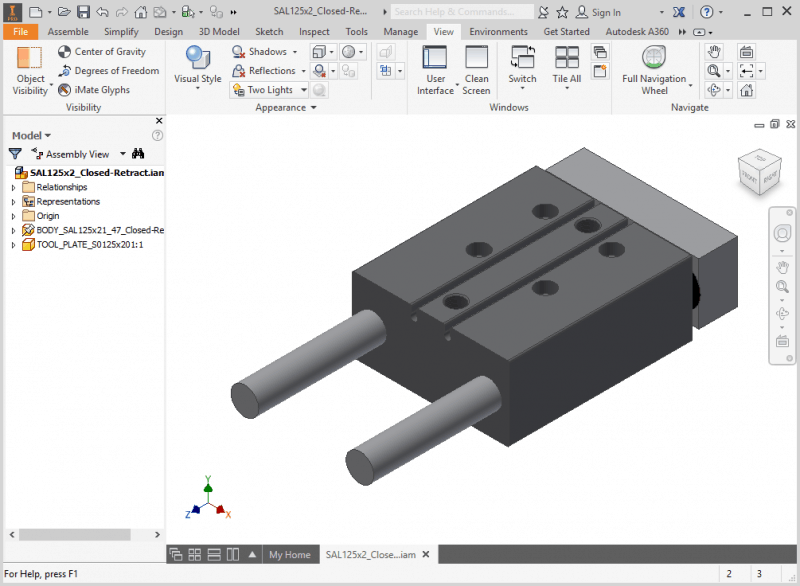
- Your model will be built in your active CAD session
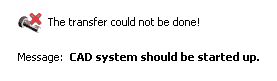
If the CAD system is not started or the wrong version was chosen, an error message will be shown.
Available Download Formats
Files are generated on-demand for each use. Multiple versions are available for most, and future versions are added as they are launched.
Popular Native CAD Formats
Autodesk Inventor 2017 to current
Creo Elements 17.0 to current
Creo Parametric 2.0 to current
CATIA IUA V4
CATIA V5 R1 to current
CATIA Transportable Macro
Pro/ENGINEER Wildfire 4.0 & 5.0
Solid Edge ST7 to ST10, 2019 to current
SolidWorks 2001+ to current
SolidWorks Transportable Macro
Siemens NX 7 to NX 12, NX 1847 to current
2D CAD Formats
AutoCAD V14 to current
DWF ASCII 5.5
DWF Binary 5.5
DWG AutoCAD, 2004 to current
DXF AutoCAD 2004 to current
HPGL V2
IGES 2D
IGES V5.0 to current
Metafile 2D (PS2) V2
Metafile 2D V1
MI V8 to current
Cloud-Based CAD Formats
Autodesk Fusion 360
COLLADA
One Space Modeling 2007 to current
OnShape
Trimble SketchUp
BIM Architecture / Plant / Marine Formats
Allplan, 2008 to current
ARCHICAD
ASCON
Autodesk Revit 2012 to current
Bentley AECOsim
IFC2x
Tribon M3VisCad
Shareable Formats
3D PDF Datasheet
BMP 2D & 3D
JPEG 2D & 3D
STL
VRML
SVG
TIFF (2D View)
3D Studio MAX
Neutral CAD Formats
AutoCAD V14 to current
DWF ASCII 5.5
DWF Binary 5.5
DWG AutoCAD 2004 to current
DXF AutoCAD 2004 to current
HPGL V2
IGES 2D
IGES V5.0 to current
Metafile 2D (PS2) V2
Metafile 2D V1
MI V8 to current
Global CAD Formats
BeckerCAD
Caddy++SAT-V4.2
Cadkey CDL V19 to current
CoCreate Modeling 2007 to current
COLLADA
HP ME 10 V9 to current
JT
Mechanical Desktop V5 to current
Mega CAD SAT-V2.0
OneSpace Modeling
PRO-Desktop
Think3 2006.2 to current
VisiCad 3D
Viskon Serie6 to current
VX (Varimetrix) V5.0 to current
WaveFront OBJ
Help / FAQ
What is PARTcommunity/PARTsolutions?
PARTserver is a CAD model service used in conjunction with many of our customers websites. They have contracted with PARTsolutions to provide this service which provides CAD models to visitors of the website. Models are delivered in the native CAD format of choice directly to the visitor.
How is PARTsolutions integrated into a website?
When a component that has this functionality is selected, visitors will be able to open the configurator page and configure the component as desired. The appropriate Order number is automatically generated, and registered visitors may Generate a CAD model, a 3D preview and or purchase the configured part. Once generated, a link is made available for the visitor to download the model in the format of their choice.
How much does a CAD model cost?
Models are provided free of charge to all visitors. However, visitors are typically required to register on the companies website before downloads can be made.
How many CAD models can I download?
This is dependant on your account type and is set and controlled by the admin staff of the hosting company.
How do I operate the 3D preview?
You can rotate the 3D model by dragging while left-clicking.
While right-clicking, drag upward to enlarge the view and downward to zoom out.
Double left click to restore the product view to screen size.
Single right click to the 3D model translucent.
Click both right and left mouse and drag to move the 3D model.
![]()
| 1. Transparent drawing (line drawing) | 8. Right preview |
| 2. Delete opaque lines | 9. Preview from above |
| 3. Opaque line drawings available | 10. Preview from bottom |
| 4. Restore display size | 11. Stereo rotational view |
| 5. Front preview | 12. Development view |
| 6. Back preview | 13. How to operate (help) |
| 7. Left preview | 14. Viewer settings |
How do I select a different CAD format?
- Locate and configure the desired part number by using the provided configurator.
- In the Login area, enter your email address and password. New users will be prompted to register (if required by hosting company).
- Use the drop down menu to select a different format.
What are the system requirements for PARTserver?
- Accurate account details for the company to verify.
- Supported browsers are Microsoft Internet Explorer 4.0+, Firefox 3+ & Chrome.
- Java script must also be enabled. (2D Viewer etc,)
Preview screen is not displayed.
To display preview of the selected parts, ActiveX control must be installed in your browser.
[1] If ActiveX is not installed in your browser, when a component is selected, a dialog appears beneath the toolbar with the message “This site might require the following ActiveX control:…”
![]()
Click the dialog beneath toolbar to install “ActiveX control”.

Sometimes you will need to install the CADENAS part as a secondary action. Select Generate 3D preview and then double click the preview window when it fails to load. You should be prompted to load the ActiveX 3D viewer.

Select Install, and then you can preview 3D components on this or any PARTsolutions enabled web site.
* In the case ActiveX control is not installed properly:
In Internet Explorer, click Internet Options on the Tools menu. Click the Security tab.
Click Internet, and then click Custom Level button to open the Active X settings.
Check “Prompt” or “Enable” for “Download signed ActiveX controls:”.
Restore original settings when ActiveX is installed successfully.

The 2D viewer (where available) requires Java to be installed and turned on. We advise you use the most up to date Java (min required Java 6 Fix level 16 +).
FireFox and Chrome (specific)
Java Must be installed for Firefox, Chrome etc
To display preview of the selected parts, JAVA must be installed in your browser.
Firefox 3.5 and above need Java 6 Fix level 16 +; the same version works for both Firefox and Chrome.
See below for installation process of JAVA.
Chrome
Some of our configurator’s incorporate the PDF 3D viewer for improved visualization. Chrome has its own PDF viewer which is not 3D compatible. Read here for details of how to setup Chrome to view load the 3D preview.
Troubleshooting tips
I click on the Preview link and nothing happens.
Most likely the problem is that you have JavaScript disabled. See this section for instructions on enabling JavaScript.
Use the following set of instructions based upon your browser type.
Internet Explorer 4x +
- Open Internet Explorer.
- Click Tools – Internet Options.
- Click the Security Tab.
- Under Web Content Zone, click the Internet icon.
- Click the Custom Level button.
- Under Scripting – Active Scripting, choose Enable.
- Click the OK button to save settings.
Other Browsers »
- Please refer to your browser documentation for how to enable Javascript.
Use the following set of instructions based upon your browser type.
Internet Explorer 6x +
- Open Internet Explorer.
- Click Tools – Internet Options.
- Click the Privacy Tab.
- On the Privacy tab, move the slider to Medium or a lower setting as needed to permit our web site to work properly. Note: See Internet Explorer Help for other cookie options.
- Click the OK button to save settings.
Internet Explorer 5x
- Open Internet Explorer.
- Click Tools – Internet Options.
- Click the Security Tab.
- Select the Internet zone, and then click Custom Level.
- Scroll down to the Cookies section.
- For Allow cookies that are stored on your computer, optionally select Enable.
- For Allow per-session cookies, select Enable, and then click OK.
FireFox
- At the top of the Firefox window, click on the Tools menu and select Options…
- Select the Privacy panel.
- Set Firefox will (drop list): to Use custom settings for history.
- Check mark Accept cookies from sites to enable Cookies, and uncheck it to disable them.
Other Browsers
Please refer to your browser documentation for how to enable cookies.